Angular - How to improve bundle size. And make your Angular app load faster.
Is your Angular application slow?
Here are 5 ways you can reduce the bundle size. And make it load faster. ⚡️
Want to skip the read? Click here to go straight to the 5 ways.
Slow.
Angular.
Applications.
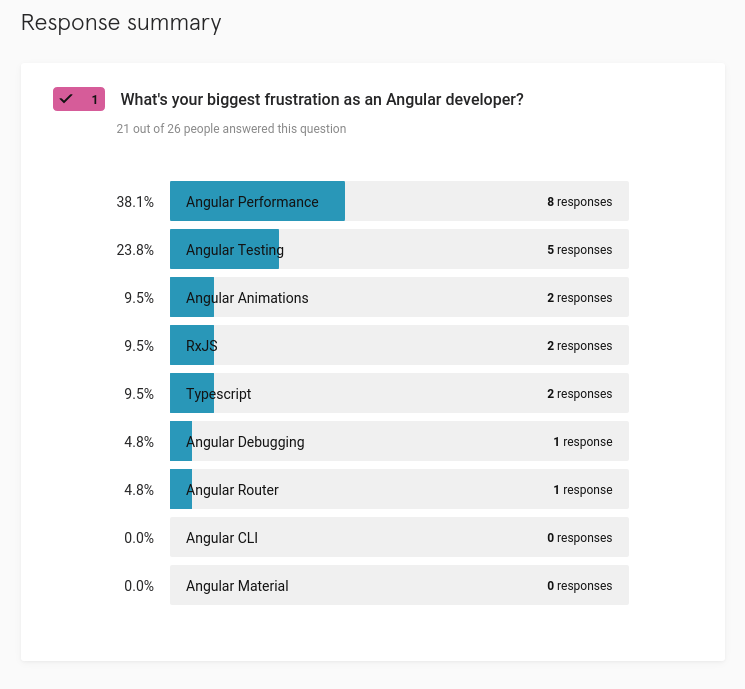
Angular developers commonly wrestle with performance issues.
It's one of the biggest draw-backs and troubles that frustrate Angular developers.
They're frustrated with Angular apps that are as agile as a dying cow.
How do I know? 🙊
Recently I surveyed a handful of Angular developers and asked them what their biggest frustration with Angular is. Here's what they told me.

And small wonder.
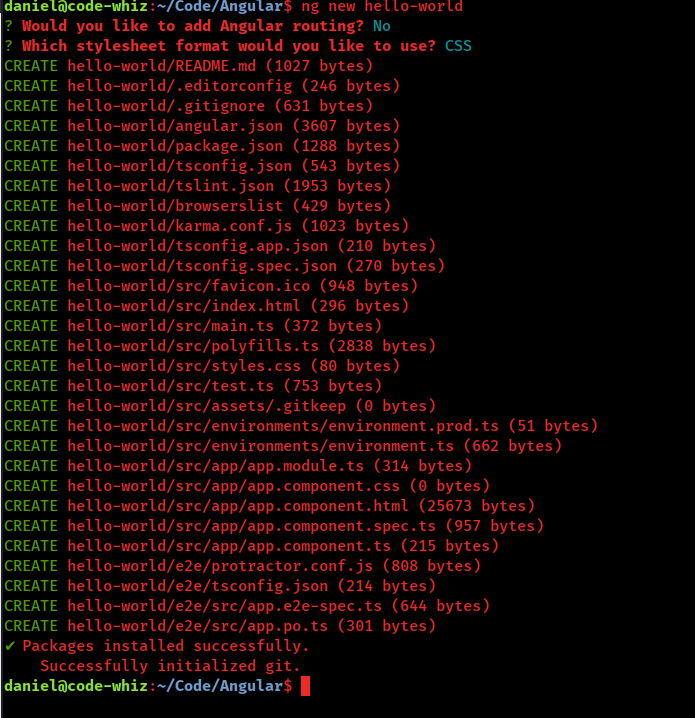
I grabbed the Angular CLI and generated a basic app. No fancy components. No extra packages or dependencies. Not even Angular routing.

And what do you think the size of the build files were?

Not to bad. I guess.
But I'd say that for a basic Angular web app with no kind of logical purpose that's a bit big.

And if we aren't careful our Angular apps will get heavy, fast.
So what can you do to reduce your bundle size?
How do you make the bundle size of your Angular app smaller?
What do you do if the main.js of your Angular application is too large?
How do you optimize the bundle size of your Angular app?
And what can be done to make your Angular app load faster?
One way to do this is to hire an Angular expert to do a performance audit on your Angular app.
Or, you can keep reading.
Here are 4 ways to improve the bundle size of your Angular app. And in my experience, these 5 places are the best direction to aim your guns.
- Investigate your app module. It has a sneaky way of growing on us.
- Lazy-load modules. Put that Angular app on a good diet.
- Tune your imports. Or you'll be singing a slower tune.
- Automatically compress the build. Woooola GZIP and Webpack!
- Update to the latest version of Angular. Is it actually this simple?
1. Investigate your app module. It has a sneaky way of growing on us.
Recently I was working on a business application built with Angular. I knew the project like the back of my hand. Or at least I thought I did, because I was the main developer and had written 95% of the code for the project.
Then I decided to do a round of optimization to make it run faster. After some diagnosing I decided the main*.js files that bootstrap the Angular application were rather large. There must be some unused imports in our app.module.ts file just adding a bunch-a trash to my Angular application.
When I opened the app.module.ts file I was shocked! 😲
It was busting with imports and libraries that the project had since outgrown.
So what did I do? I yanked those imports out and trimmed the project up, nice and clean, just like a hipster-house-puppy.

Yes buddy, if your Angular app bundle is too large the first place I'd go hunting is in the app.module.ts.
You might scare up some weird stuff. 🙈
2. Lazy-load modules. Put that Angular app on a good diet.
In case you didn't know it, Angular has a really cool feature called the Angular module.
But what is it?
Angular modules are chunks of code that can be imported into various parts of your application. A module can contain grouped pieces of components, services and other functionality, each focused on a feature area, specific domain, workflow, etc...
And why are they cool?
They're cool because Angular modules brings the power of modules to web applications. As far as I know there is no other frontend library or framework that does this as well as Angular does.
As your Angular application develops and matures, you must split the various parts of your web application into feature modules that can be loaded later if you're going to improve the size of your build bundle.
And then these modules can be lazy-loaded later, after the main part of your Angular application has been loaded and displayed to the user.
The Angular docs have a great article on how to set up lazy-loading. I'd recommend you check it out.
And if you're not sure what kind of lazy-loading strategy to use, then this will teach you about Angular's preloading strategies.
3. Tune your imports. Or you'll be singing a slow tune.
Some blooming idiot might call me a bag of oats for telling you to watch your imports. They'll likely yell at me saying that the Angular tree-shaking stuff is smart enough to weed out the unused or poor imports.
And though I wish they were true. And even though Angular tree-shaking has improved. They're wrong. At least that's been my experience.
So... watch those imports and make sure that all unused imports are snipped away.
Secondly, don't import an entire library and then only use part of it. When you do an import make sure that you only import what you'll actually need.
Instead of this...
import * as my-import from 'package-name';...do this.
import { something } from 'package-name';4. Automatically compress the build. Woooola GZIP and Webpack!
The potential of this step is powerful.
So powerful that it could slash the bundle size of your Angular application by up to 3 times.
In a nutshell, we'll customize the build process to zip our files using GZIP. We'll do this by customizing the webpack build process.
The first step is to install the custom-webpack package. It's crucial that you install the version that matches your Angular version so head over to the package page and grab the installation instructions for your specific version of Angular.
The second package you need to install is compression-webpack-plugin. It's this simple.
npm install compression-webpack-plugin --save-devAnd now that we've got our dependencies installed we need to create a webpack.config.json in the root directory of our Angular application. It'll look like this.
var path = require('path');
var CompressionPlugin = require('compression-webpack-plugin');

module.exports = {
    entry: {
    },
    output: {
      path: path.resolve(__dirname, 'dist'),
      filename: '[name].[hash].js'
    },
    plugins: [
      new CompressionPlugin()
    ]
  };
And last but not least, we will have to change the angular.json file.
We'll configure Angular to use our custom webpack builder and webpack config file.
"architect": {
        "build": {
          "builder": "@angular-builders/custom-webpack:browser",
          "options": {
            "customWebpackConfig": {
              "path": "./webpack.config.js"
            },
          }
          ...
       }
5. Update to the latest version of Angular. Is it actually this simple?
Yup. It's this simple. Especially if you're running a really outdated version of Angular like Angular 6 or Angular 7.
Angular performance continues to be improved so make sure you keep your Angular application up to date.
Plus, it isn't hard. There are Angular apps with millions of users, and the development teams are reporting that it only take 30 minutes or so to update from one version of Angular to the next. Not to mention that the Angular team has a really helpful upgrade website.
So what's your excuse?
Conclusion
If you're wanting to down-size the bundle size of your Angular app then these are the 4 places I'd recommend you point your guns first. When I'm hired to optimize an Angular these are the corners that I storm first.
And Angular might have a performance quirk, but I still prefer it over some other libraries and frameworks out there.
Questions? Comments? Then please drop a comment below.

Daniel Kreider - Angular Developer
