How to create an Angular Schematics to import a CSS file
One of my recent projects was a loading button library for the Angular Material buttons.
And one of the things I needed to do was to create the schematics for Angular's ng add {package-name} command.
Why?
First of all, any Angular library that can be added with the ng add ... command gives a professional and well-maintained feel. 😉
The other reason I needed to create an Angular schematic was because I didn't want to force users to manually import a CSS file that my library depends on. Therefore I needed an Angular schematics that would automatically import a CSS asset into the angular.json file.
Now... I'm not at all an Angular schematics, and the documentation isn't the best, so it took some digging into source code examples to figure this out.
So after some effort and rummaging through source code, I discovered how to create an Angular schematics that can configure the angular.json file and import a CSS file.
Here's how you can do it as well.
Preface: Creating the demo project
If you've already got your own project created then skip to the next step.
Otherwise, here are the commands we'll use to create a new Angular workspace and a demo library.
We'll begin by creating the workspace.
ng new schematics-demo --no-create-applicationThen we'll change the directory.
cd schematics-demoAnd finally generate our demo library.
ng generate library schematics-library
Now we're ready to get into the power of Angular schematics and learn how to automate CSS stuff.
1. Create the ng-add schematic
So how do we create an Angular schematic for our new library?
Here are the first 3 steps.
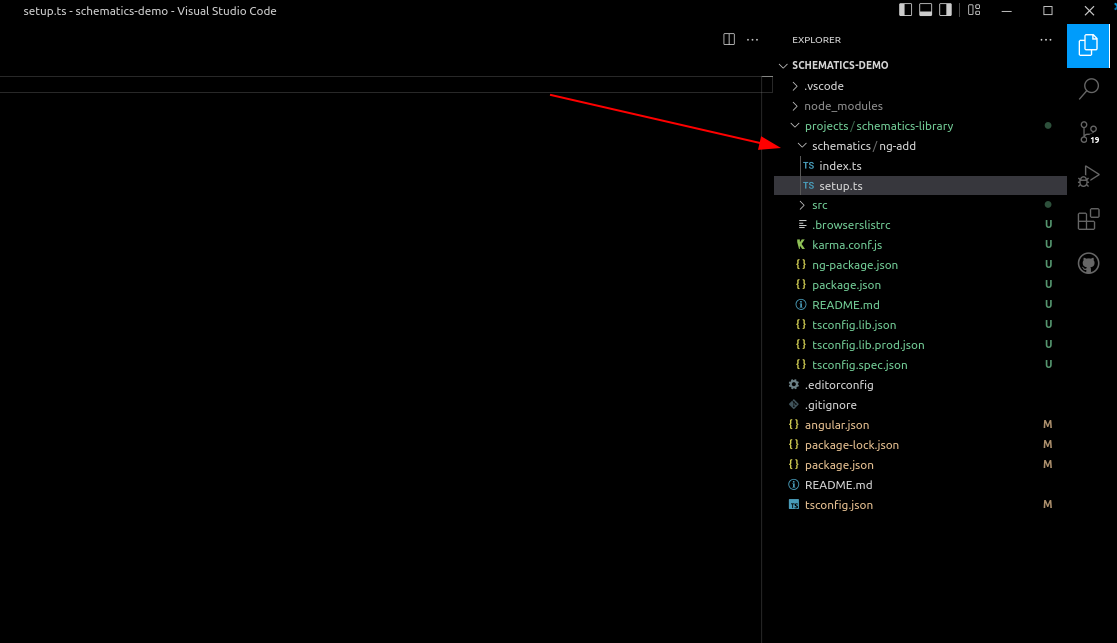
- Create a
schematicsfolder inside the root folder of our library. - And inside the new folder create another folder named
ng-add. - Finally, inside the
ng-addfolder create two files -index.tsandsetup.ts.
Here's a demo screenshot of what your project structure should look like.

The next step is to open the libraries package.json file and declare a new peer-dependency on the @angular/cdk library like this.
{
  "name": "schematics-library",
  "version": "0.0.1",
  "peerDependencies": {
    "@angular/common": "^13.3.0",
    "@angular/core": "^13.3.0",
    "@angular/cdk": "^13.3.0"
  },
  "dependencies": {
    ...
  }
}
And now back to the setup.ts file and add the functions to insert a CSS file.
import {chain, Rule } from '@angular-devkit/schematics';
import { getProjectFromWorkspace } from '@angular/cdk/schematics';
import { getProjectTargetOptions } from '@angular/cdk/schematics';
import { updateWorkspace} from '@schematics/angular/utility/workspace';

const themePath = `./node_modules/ngx-loading-buttons/src/styles.css`;

export function cssAdd (options: any): Rule {
  return async () => {
    return chain([
        insertCSSDependency(options.project)
    ]);
  };
}

function insertCSSDependency(project: string): Rule {
    return chain([
      addThemeStyleToTarget(project, 'build', themePath),
      addThemeStyleToTarget(project, 'test', themePath),
    ]);
}

function addThemeStyleToTarget(projectName: string, targetName: 'test' | 'build', assetPath: string): Rule {
    return updateWorkspace(workspace => {
        const project = getProjectFromWorkspace(workspace, projectName);
        const targetOptions = getProjectTargetOptions(project, targetName);
        const styles = targetOptions['styles'] as (string | {input: string})[];

        const existingStyles = styles.map(s => (typeof s === 'string' ? s : s.input));

        for (let [, stylePath] of existingStyles.entries()) {
            if (stylePath === assetPath)
                return;
        }

        styles.unshift(assetPath);
    });
}
And our index.ts file.
import { Rule, SchematicContext, Tree } from '@angular-devkit/schematics';
import { NodePackageInstallTask, RunSchematicTask } from '@angular-devkit/schematics/tasks';

export function ngAdd(): Rule {
  return (tree: Tree, context: SchematicContext) => {
    const installTaskId = context.addTask(new NodePackageInstallTask());
    context.addTask(new RunSchematicTask('setup-css', {}), [installTaskId]);
    return tree;
  };
}
2. Declare your Angular schematic
The next step is to create a new file inside the schematics folder.
This file will be named collection.json and is used to specifically declare the schematics.
{
    "$schema": "../../../node_modules/@angular-devkit/schematics/collection-schema.json",
    "schematics": {
      "ng-add": {
        "description": "Add schematics-library to the project.",
        "factory": "./ng-add/index#ngAdd"
      },
      "setup-css": {
        "description": "Installs the CSS file after the ng-add dependencies have been installed.",
        "factory": "./ng-add/setup#cssAdd"
      }
    }
}
3. Bundle and deploy the schematic
What's left to do?
Last, but not least, we need to make sure our schematics gets declared inside the package.json file and also deployed with the rest of the files. Otherwise, the ng add {package-name} command won't know what to do with our package.
Here's what we need to add to our package.json.
{
  "name": "schematics-library",
  "version": "0.0.0",
  "peerDependencies": {
      ...
  },
  "scripts": {
    "build": "tsc -p tsconfig.schematics.json",
    "postbuild": "copyfiles schematics/*/schema.json schematics/*/files/** schematics/collection.json ../../dist/ngx-loading-buttons/"
  },
  "schematics": "./schematics/collection.json",
  "devDependencies": {
    "copyfiles": "file:../../node_modules/copyfiles",
    "typescript": "file:../../node_modules/typescript"
  },
  "ng-add": {
    "save": "dependencies"
  }
}
What now?
And that, my friend, is how to use Angular schematics to edit the angular.json file and import a static asset (e.g. CSS or JavaScript file).
I think that Angular schematics are cool.
What do you think of Angular schematics? Let me know in the comments below.

Angular Consultant
