The Complete Angular Authentication Demo
Need to add authentication to your Angular application?
Here's the complete guide to setting up a login form and authentication with Angular.
Want to go straight to the code? Click here.
Angular.
Authentication.
And authorization.
How do you do it?
How do you create a login component? Or build an authentication service?
How do you add a login form to your Angular application?
How do you check if a user is unauthenticated? Or authenticated?
And how do you make sure that users that aren't logged in automatically see your login page? And the logged-in (authenticated) users see the dashboard or something else?
In this guide, I'm going to show you how to add authentication to your Angular app.
Why?
Because I want to make you a better Angular developer.
How would it feel if you could quickly add authentication features to your Angular app? Or whip together a beautiful login form? Or quickly decide what parts of your Angular app require authentication and what parts don't?
It's like we're adding a door to our Angular application. Or maybe a secret room. And only those with the keys are allowed in.

So, let's get started.
Table of Content
- Creating our Angular application
- The Authentication Service (Typescript)
- The Login Module
- Bonus: Create a Beautiful Login Form with Bootstrap and Validation Errors
- Adding the Route Guards
- Last step, connect the pieces of our Angular application.
- How do we log out?
- How to redirect to login page based on server response?
- Conclusion
Creating our Angular application
For this demo, I'm going to create a new Angular application to demonstrate the login and authentication functionality.
But, if you already have an Angular application then jump to the next step. I'll show you how to add the login stuff to a new Angular application or an existing one. Doesn't matter.
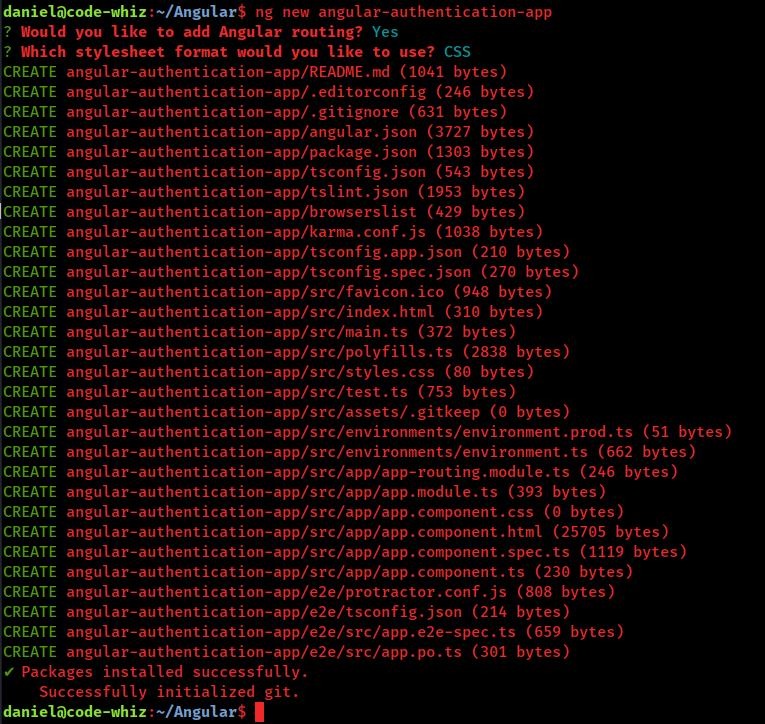
So, to create the demo we'll open a terminal and use the Angular CLI to get started. Here's the command.
ng new angular-authentication-app
And there's our brand new Angular application!
Before we get started we need to sweep up the app.component.html file and remove all the boilerplate stuff that the CLI generated. So, remove everything from the app.component.html file except this line.
<router-outlet></router-outlet>And that's it.
Roll up your sleeves...
Grab your keyboard...
And get ready to rub some brains cells.
We're going to create an authentication service for our Angular application!
The Authentication Service (Typescript)
So where do we start?
We'll begin with an authentication service. This authentication service will be used to handle the login calls, the authentication state and also logout functionality. Some might crow that using a service to handle authentication state is a bad idea. And that we should instead use a state management solution like NgRx.
I hear them - they do have a point.
Stage management gives your Angular applications scads of benefits. But don't forget that it makes the size of your production application larger. And requires more set up code as well.
So, to keep our Angular application smaller, we'll use an authentication service to handle the login functionality and state.
Here's the command we'll use to create the authentication service.
ng generate service authentication
Our authentication service needs to have 3 functions to handle 3 basic authentication functionalities.
- Login - A function to handle the login stuff.
- Logout - A function to handle the logout stuff.
- Is the user logged in - A function to check if the user is logged in or not.
Here's what our authentication service will look like when we're done.
import { Injectable } from '@angular/core';
import { Observable, of } from 'rxjs';
import { HttpResponse } from '@angular/common/http';

@Injectable({
  providedIn: 'root'
})
export class AuthenticationService {

  fakeUsername: string = "username";
  fakePassword: string = "password";

  constructor() { }

  login(username: string, password: string): Observable<any> {
    // Mock a successful call to an API server.
    if (username == this.fakeUsername && password == this.fakePassword) {
      localStorage.setItem("token", "my-super-secret-token-from-server");
      return of(new HttpResponse({ status: 200 }));
    } else {
      return of(new HttpResponse({ status: 401 }));
    }
  }

  logout(): void {
    localStorage.removeItem("token");
  }

  isUserLoggedIn(): boolean {
    if (localStorage.getItem("token") != null) {
      return true;
    }
    return false;
  }
}
If you're smart, and I'm sure you are, you'll notice we mocked the login functionality. That's because... well... because I'm lazy and didn't feel like setting up an authentication server for this demonstration because we're focusing on how to add authentication to our Angular application.
That said, it still returns an observable. So all you need to do is replace it with an HTTP call to your server. 🥳 🥳 🥳
The Login Module
With the authentication service finished and waiting to be used, we're ready for the login module.
The login module will be a lazy-loaded module that shows the login form for our Angular application. You can think of it as the door to our Angular application.

Here are the commands you'll need to run to get started.
ng generate module --routing login
ng generate component login
Now, we'll need to hook up the routing to our login component, so add the route to the login-routing.module.ts file.
import { NgModule } from '@angular/core';
import { Routes, RouterModule } from '@angular/router';
import { LoginComponent } from './login.component';

const routes: Routes = [
  {
    path: '/',
    component: LoginComponent
  }
];

@NgModule({
  imports: [RouterModule.forChild(routes)],
  exports: [RouterModule]
})
export class LoginRoutingModule { }
And then we'll have to configure app-routing.module.ts to route to our login module.
.
import { NgModule } from '@angular/core';
import { Routes, RouterModule } from '@angular/router';

const routes: Routes = [
  {
    path: 'login',
    loadChildren: () => import('./login/login.module').then(m => m.LoginModule)
  }
];

@NgModule({
  imports: [RouterModule.forRoot(routes)],
  exports: [RouterModule]
})
export class AppRoutingModule { }
Import the ReactiveFormsModule into our login.module.ts file.
import { NgModule } from '@angular/core';
import { CommonModule } from '@angular/common';

import { LoginRoutingModule } from './login-routing.module';
import { LoginComponent } from './login.component';
import { ReactiveFormsModule } from '@angular/forms';

@NgModule({
  declarations: [LoginComponent],
  imports: [
    CommonModule,
    ReactiveFormsModule,
    LoginRoutingModule
  ]
})
export class LoginModule { }
Add a form group for the login form to the login.component.ts file.
import { Component, OnInit } from '@angular/core';
import { FormControl, FormGroup, Validators } from '@angular/forms';
import { Router } from '@angular/router';
import { AuthenticationService } from '../authentication.service';

@Component({
  selector: 'app-login',
  templateUrl: './login.component.html',
  styleUrls: ['./login.component.css']
})
export class LoginComponent implements OnInit {

  loginForm = new FormGroup({
    username: new FormControl('', Validators.required),
    password: new FormControl(['', Validators.required, Validators.minLength(5)])
  });

  constructor(
    private authenticationService: AuthenticationService,
    private router: Router) { }

  ngOnInit(): void {
  }

  login(): void {
    let username = this.loginForm.get('username').value;
    let password = this.loginForm.get('password').value;
    this.authenticationService.login(username, password).subscribe(() => this.router.navigateByUrl("/"));
  }

}
And last of all, use some basic HTML to create a login form.
<h1>Login</h1>
<form [formGroup]="loginForm">
    <input type="text" placeholder="Username" formControlName="username">
    <br>
    <input type="password" placeholder="Password" formControlName="password">
    <br>
    <button type="submit">Log In</button>
</form>
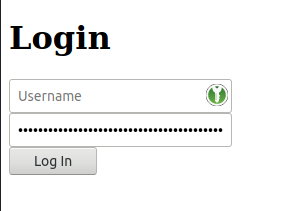
If you open your Angular application and go to http://localhost:4200/login you'll see a super-duper-basic login screen.

Ugly?
Yeah, I know...
...but sit tight buddy. This isn't an article about UX or fancy design principles.
But even so, if you're set on creating a nice login form then here's how to do it. Otherwise, you can jump to the next step.
Bonus: Create a Beautiful Login Form with Bootstrap and Validation Errors
Assuming you've added the Bootstrap style sheets to your project, here's how to create a beautiful login form with validation errors that users can understand.
Inside the login component's Typescript file, we'll add two new functions called usernameControl and passwordControl.
import { Component, OnInit } from '@angular/core';
import { FormControl, FormGroup, Validators } from '@angular/forms';
import { Router } from '@angular/router';
import { AuthenticationService } from '../authentication.service';

@Component({
  selector: 'app-login',
  templateUrl: './login.component.html',
  styleUrls: ['./login.component.css']
})
export class LoginComponent implements OnInit {

  loginForm = new FormGroup({
    username: new FormControl('', Validators.required),
    password: new FormControl(['', Validators.required, Validators.minLength(5)])
  });

  constructor(
    private authenticationService: AuthenticationService,
    private router: Router) { }

  ngOnInit(): void {
  }

    get usernameControl(): FormControl {
      return this.loginForm.get('username') as FormControl;
    }

    get passwordControl(): FormControl {
      return this.loginForm.get('password') as FormControl;
    }

  login(): void {
    let username = this.loginForm.get('username').value;
    let password = this.loginForm.get('password').value;
    this.authenticationService.login(username, password).subscribe(() => this.router.navigateByUrl("/"));
  }

}
And then we'll replace our current HTML with the HTML below.
<main class="form-signin">
    <form [formGroup]="loginForm">
        <h1 class="h3 mb-3 fw-normal">Sign In</h1>
        <div class="form-floating">
            <input type="email" class="form-control" id="floatingInput" formControlName="username">
            <label for="floatingInput">Username</label>
            <div *ngIf="loginForm.invalid && usernameControl?.touched && usernameControl.errors">
                <span *ngIf="usernameControl.errors['required']">Username is required</span>
                <span *ngIf="usernameControl.errors['email']">Username must be an email</span>
            </div>
        </div>
        <div class="form-floating">
            <input type="password" class="form-control" id="floatingPassword"  formControlName="password">
            <label for="floatingPassword">Password</label>
            <div *ngIf="loginForm.invalid && passwordControl?.touched && passwordControl.errors">
                <span *ngIf="passwordControl.errors['minlength']">Password must have at least 8 characters</span>
            </div>
        </div>
        <button class="w-100 btn btn-lg btn-primary" type="submit" [disabled]="this.loginForm.invalid">Sign in</button>
    </form>
</main>
And then, we'll add the CSS below to our CSS file.
.form-signin {
  width: 100%;
  max-width: 330px;
  padding: 15px;
  margin: auto;
}

.form-signin .checkbox {
  font-weight: 400;
}

.form-signin .form-floating:focus-within {
  z-index: 2;
}

.form-signin input[type="email"] {
  margin-bottom: -1px;
  border-bottom-right-radius: 0;
  border-bottom-left-radius: 0;
}

.form-signin input[type="password"] {
  margin-bottom: 10px;
  border-top-left-radius: 0;
  border-top-right-radius: 0;
}
And wha-da-ya-know?
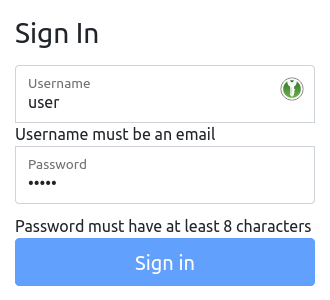
We get a beautiful login form like this, complete with validation errors.

You're welcome! 😉
Adding the Route Guards
Still with me? Then you're cool! 😎
So how do we guard the other parts of our application from unauthorized access?

That's what route guards are for.
So, grab that Angular CLI again and whip up a route guard for your Angular application.
ng generate guard authentication-guardYou'll be asked what interfaces to implement. See the screenshot below for the recommended choices.

Now, for the login in our route guard. We'll inject our AuthenticationService as well as Angular's Router service. And also add a private authenticate() function that our interfaces will call.
Here's the sauce.
import { Injectable } from '@angular/core';
import { CanActivate, CanActivateChild, CanLoad, Route, UrlSegment, ActivatedRouteSnapshot, RouterStateSnapshot, UrlTree, Router } from '@angular/router';
import { Observable } from 'rxjs';
import { AuthenticationService } from './authentication.service';

@Injectable({
  providedIn: 'root'
})
export class AuthenticationGuard implements CanActivate, CanActivateChild, CanLoad {

  constructor(
    private authService: AuthenticationService,
    private router: Router
  ) { }

  canActivate(
    next: ActivatedRouteSnapshot,
    state: RouterStateSnapshot): Observable<boolean | UrlTree> | Promise<boolean | UrlTree> | boolean | UrlTree {
    return this.authenticate();
  }
  canActivateChild(
    next: ActivatedRouteSnapshot,
    state: RouterStateSnapshot): Observable<boolean | UrlTree> | Promise<boolean | UrlTree> | boolean | UrlTree {
    return this.authenticate();
  }
  canLoad(
    route: Route,
    segments: UrlSegment[]): Observable<boolean> | Promise<boolean> | boolean {
    return this.authenticate();
  }

  private authenticate(): boolean {
    if (!this.authService.isUserLoggedIn()) {
      this.router.navigateByUrl("/login");
      return false;
    } else {
      return true;
    }
  }
}
Say, you still with me? Confused?
Great, that means you're learning.
So what did we just do? We created a route guard that uses our authentication service to make sure the user has a token stored in the browser. If they don't then we redirect them to the login module and ask for their username and password.
And that's about it.
Except...
We've got one more line of code to snap into place...
And make this Angular application hum.
Open the app-routing.module.ts file and add the canActivate setting.
import { NgModule } from '@angular/core';
import { Routes, RouterModule } from '@angular/router';
import { AuthenticationGuard } from './authentication.guard';

const routes: Routes = [
  {
    path: 'login',
    loadChildren: () => import('./login/login.module').then(m => m.LoginModule),
    canActivate: [AuthenticationGuard]    // Actually quite dumb! Why authenticate for the authenticate page???
  }
];

@NgModule({
  imports: [RouterModule.forRoot(routes)],
  exports: [RouterModule]
})
export class AppRoutingModule { }
And that completes the section on setting up our authentication route guard.
To summarize, we created a route guard that gets called when someone tries accessing a path. Of course, as your Angular application grows you'll add more paths that route to other modules and components.
Last step, connect the pieces of our Angular application.
Now, let's add another module to our demo application called the dashboard module.
This is purely to demonstrate the power of route guards.
ng generate module --routing dashboard
ng generate component dashboard
And then we'll update our app-routing.module.ts file and make the dashboard module our default route.
import { NgModule } from '@angular/core';
import { Routes, RouterModule } from '@angular/router';
import { AuthenticationGuard } from './authentication.guard';

const routes: Routes = [
  {
    path: 'login',
    loadChildren: () => import('./login/login.module').then(m => m.LoginModule),
    canActivate: [AuthenticationGuard]
  },
  {
    path: '',
    loadChildren: () => import('./dashboard/dashboard.module').then(m => m.DashboardModule),
    canActivate: [AuthenticationGuard]
  }
];

@NgModule({
  imports: [RouterModule.forRoot(routes)],
  exports: [RouterModule]
})
export class AppRoutingModule { }
If I try to load the application I immediately get redirected to the login page. I can log in with the fake credentials and I'll see the new dashboard page.
How do we log out?
Inside of our dashboard.component.ts file we'll add a logout function that can be called by our logout button.
import { Component } from '@angular/core';
import { Router } from '@angular/router';
import { AuthenticationService } from '../authentication.service';

@Component({
  selector: 'app-dashboard',
  templateUrl: './dashboard.component.html',
  styleUrls: ['./dashboard.component.css']
})
export class DashboardComponent {

  constructor(
    private authService: AuthenticationService,
    private router: Router
  ) { }

  logout(): void {
    this.authService.logout();
    this.router.navigateByUrl("/login");
  }

}
When the logout function is called we delete the token from local storage and redirect to the login page.
If they press the back button in the browser to go back to the dashboard, the route guards will intercept the request and redirect to the login page.
Simple authentication demo?
Of course!
Why should it be complicated?
How to redirect to login page based on server response?
That, my friend, takes an HTTP interceptor.
We'll create a new HTTP interceptor to intercept HTTP requests and responses. If the server returns a 401 or 403, we'll redirect to the login page.
So, grab the Angular CLI and use it to generate a blank HTTP interceptor.
ng generate interceptor authenticationOpen the app.module.ts file and add the new HTTP interceptor as a provider.
import { BrowserModule } from '@angular/platform-browser';
import { NgModule } from '@angular/core';

import { AppRoutingModule } from './app-routing.module';
import { AppComponent } from './app.component';
import { AuthenticationInterceptor } from './authentication.interceptor';

@NgModule({
  declarations: [
    AppComponent
  ],
  imports: [
    BrowserModule,
    AppRoutingModule
  ],
  providers: [
    AuthenticationInterceptor
  ],
  bootstrap: [AppComponent]
})
export class AppModule { }
And last but not least, here's the code for our AuthenticationInterceptor.
import { Injectable } from '@angular/core';
import {
  HttpRequest,
  HttpHandler,
  HttpEvent,
  HttpInterceptor,
  HttpErrorResponse
} from '@angular/common/http';
import { Observable } from 'rxjs';
import { Router } from '@angular/router';
import { AuthenticationService } from './authentication.service';
import { tap } from "rxjs/operators";

@Injectable()
export class AuthenticationInterceptor implements HttpInterceptor {

  constructor(
    private authService: AuthenticationService,
    private router: Router
  ) {}

  intercept(request: HttpRequest<unknown>, next: HttpHandler): Observable<HttpEvent<unknown>> {
    return next.handle(request).pipe(
      tap(
        (event) => {},
        (error) => {
          if (error instanceof HttpErrorResponse) {
            switch (error.status) {
              case 401:
              case 403:
                this.authService.logout();
                this.router.navigateByUrl("/login");
                break;
              default:
                break;
            }
          }
        }
      )
    );
  }
}
Conclusion
And that, my friend, is the complete login demo for Angular.
We created a module to handle the login form. An authentication service to handle login and logout functionality. As well as a route guard to decided if user gets access to our dashboard or not.
Now, before I run off, I cannot finish this post about Angular authentication without saying this:
Authentication in your Angular application does NOT replace authentication in your backend. Your API server or other backend service must also implement proper authentication and authorization because that's the safest place to do it.
Questions?
Comments?
Go ahead and drop a comment below. 👇

Angular Consultant
